If you’re a startup founder without a tech background, the mobile app development process can feel like learning a new language — complex, costly, and filled with unknowns. But here’s the truth: you don’t need to be a developer to successfully launch an app. You just need the right roadmap.
In today’s hyper-digital world, launching a mobile app isn’t optional — it’s a growth strategy. With over 250 million daily app downloads, mobile software is driving how businesses reach, engage, and retain their users. Whether you’re building the next productivity tool or a niche marketplace, understanding the mobile app development process is your first step toward turning your idea into a real product.
This blog breaks down the entire process of mobile app development — from ideation to deployment — in plain language. No jargon. No bloated tech talk. Just practical, founder-first guidance.
We’ll walk you through:
- Choosing the right type of app
- Decoding the step-by-step mobile app development process
- Avoiding costly rookie mistakes
- And how to lead your app build like a pro — even if you’ve never opened a line of code
Let’s get into it.
What Is the Mobile App Development Process?
The mobile app development process is the structured journey of turning an app idea into a real, working product. It covers everything from strategy and design to development, testing, and post-launch support.
For non-technical founders, understanding the process of mobile app development is essential — not just to stay informed, but to avoid costly mistakes. In fact, studies show that nearly 70% of app projects fail due to unclear processes, poor planning, or weak communication between founders and development teams. That’s a risk you don’t want to take.
Think of this process like building a house. You don’t start with paint colors — you start with a solid foundation, a clear blueprint, and trusted builders. Similarly, building an app involves a defined path:
- Defining your idea and goals
- Choosing the right approach (native, cross-platform, or no-code)
- Designing for usability
- Writing code
- Testing thoroughly
- Launching to app stores
- Ongoing maintenance and optimization
Even if you’re outsourcing development, having a clear view of the mobile app development process puts you in control. It helps you ask the right questions, give better feedback, and ensure your product is built the right way — the first time.
Types of Mobile Apps: Choose the Right Fit
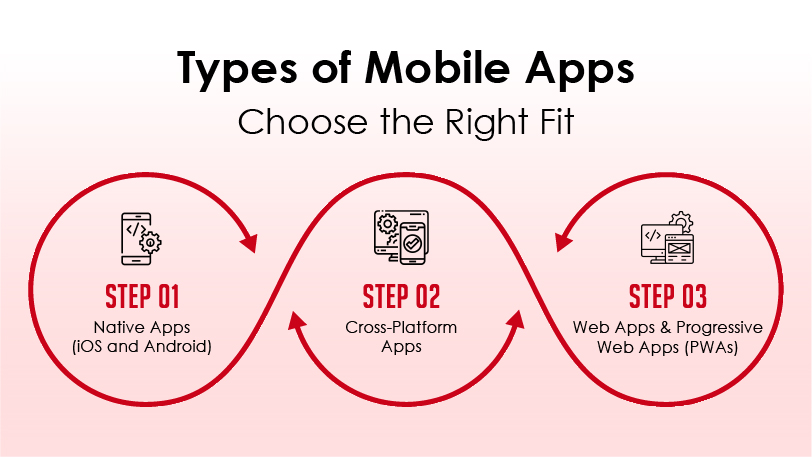
Before you dive into building your app, you need to decide what kind of app you’re building — and that choice directly impacts your mobile app development process, cost, and speed to market.
There are three main types of mobile apps:
1. Native Apps (iOS and Android)
Native apps are built specifically for one platform — either iOS (Apple) or Android (Google). That means developers use platform-specific programming languages like Swift for iOS or Kotlin for Android.
Pros:
- Best performance and speed
- Full access to device features (camera, GPS, push notifications)
- Superior user experience
Cons:
- Separate codebases for iOS and Android (doubling development time and cost)
- Longer development timelines
If your business relies heavily on performance (e.g., gaming, real-time GPS, video streaming), going native might be your best bet. The iOS mobile app development process and Android mobile app development process both follow similar steps, but require different tools and expertise.
2. Cross-Platform Apps
Cross-platform apps are built using frameworks like Flutter or React Native, allowing developers to write one codebase that works on both iOS and Android.
Pros:
- Faster development with shared code
- Lower cost for MVPs
- Easier maintenance
Cons:
- Slightly reduced performance compared to native
- Limited access to some native features
This is the go-to option for most startups, especially when time and budget are limited but the app still needs to reach both major app stores quickly.
3. Web Apps & Progressive Web Apps (PWAs)
Web apps run through a browser, and PWAs offer app-like features (like offline access) without needing to be downloaded from app stores.
Pros:
- Fast and low-cost development
- No approval process from app stores
- Easy to update
Cons:
- Limited functionality
- Can’t access many device features
- Weaker performance on mobile
Web apps are ideal for early-stage validation or internal tools that don’t need a full app-store presence.
Pro Tip: Your choice of app type sets the tone for the entire enterprise mobile app development process — from tech stack to team structure and launch timelines. Don’t skip this decision.

App Complexity: How It Impacts the Process
Not all apps are created equal. Some take a few weeks to build — others take months or even a year. The difference? App complexity.
App complexity plays a huge role in shaping your mobile app development process. It affects everything from development time and team size to budget and testing scope.
Here’s how to understand it:
1. Simple Apps
These are apps with limited functionality, no login system, and minimal backend logic. Think:
- Basic calculators
- Note-taking tools
- Static content apps
Development Time: 2–3 months
Cost Range: Low
Ideal For: MVPs, solo founders, internal tools
2. Moderately Complex Apps
These include core features like user authentication, real-time data sync, API integrations, and dashboards. Think:
- Task managers
- Fitness tracking apps
- Food delivery MVPs
Development Time: 3–6 months
Cost Range: Mid-tier
Ideal For: Startups aiming for market validation
3. Complex Apps
These apps require advanced features like AI integration, streaming, third-party payment systems, or multi-user roles. Think:
- Uber-style logistics apps
- Social media platforms
- Healthcare management systems
Development Time: 6–12+ months
Cost Range: High
Ideal For: Funded startups or enterprise-level products
And it’s not just features — the number of user types (e.g., admin, user, vendor), scalability needs, and backend infrastructure all add layers of complexity.
Knowing your app’s complexity early helps you choose the right development approach and avoid underestimating timelines or costs.
App Development Routes: 4 Proven Ways to Build Your App
As a non-technical founder, you don’t need to write code — but you do need to choose the right path to build your app. The route you pick will shape your entire mobile app development process, from timeline and cost to quality and control.
Here are the four most common development routes:
1. Hiring an In-House Development Team
Building a team from scratch gives you full control over the process. You hire developers, designers, and product managers directly under your company.
Pros:
- Total control over product decisions
- Ideal for long-term, product-heavy startups
- Seamless communication and team alignment
Cons:
- Time-consuming to hire the right talent
- High fixed costs (salaries, benefits, office tools)
- Requires strong internal project management
This route suits enterprise founders or well-funded startups ready to build out a full enterprise mobile app development process internally.
Agencies like TechnBrains bring a full team of experts — strategy, UI/UX, developers, testers — and manage the entire mobile app design and development process for you.
Pros:
- Faster time-to-market
- Lower overhead than in-house teams
- Access to experienced talent and proven workflows
Cons:
- Less control over individual team members
- Requires clear communication and a strong brief
This route is ideal for non-technical founders who want professional results without hiring an internal team from scratch.
Many successful founders prefer this model — especially for MVPs — because they get full-cycle support while staying focused on business goals.
3. Using Freelancers
Freelance platforms like Upwork and Toptal offer access to individual designers, developers, or QA testers.
Pros:
- Flexible and affordable
- Easy to scale work up or down
Cons:
- You’ll need to manage the process yourself
- Risk of inconsistent quality and communication gaps
- No built-in accountability or long-term product planning
If you go this route, be prepared to invest more time managing milestones and quality checks.
4. No-Code/Low-Code Platforms
Tools like Bubble, Glide, or Adalo let you build simple apps with drag-and-drop interfaces — no coding required.
Pros:
- Fast and cost-effective for prototypes
- Great for testing ideas and internal tools
Cons:
- Limited scalability
- Customization is restricted
- Not suitable for complex business logic or enterprise use
This option works best for very early MVPs or validating your idea before investing in full development.
The Mobile App Development Process for Non-Technical Founders: 7 Easy Steps
Now let’s break down the full mobile app development process into simple, actionable steps. Whether you’re building an iOS app, Android app, or cross-platform MVP, these stages apply to virtually every project — no coding experience required.
Step 1: Define Your Strategy
Every great app starts with a clear purpose. What problem does your app solve? Who’s your target user? What’s the business model?
Apps built with a clear strategy are 3x more likely to succeed in the market, according to Product Plan.
At this stage, document:
- Your core app idea
- Key user personas
- Competitor analysis
- Unique value proposition (UVP)
Your strategy will guide every other step in the mobile app design and development process — from features to tech choices.
Step 2: Scope and Plan the Features
Don’t try to build everything at once. Focus on a Minimum Viable Product (MVP) — the smallest version of your app that solves the user’s core problem.
Create a basic feature list (we recommend “must-have” vs. “nice-to-have”) and decide on platforms — iOS, Android, or both.
This step also includes planning your tech stack and choosing your development route (agency, in-house, etc.).
Step 3: Design the UX/UI
Now it’s time to bring your idea to life visually.
- UX (User Experience): How users move through your app
- UI (User Interface): How it looks — layout, colors, typography
Designers will usually provide:
- Wireframes (the app’s blueprint)
- High-fidelity mockups
- Clickable prototypes
Remember, 90% of users stop using an app due to poor performance or bad design. Investing in UX at this stage is non-negotiable.
Step 4: Begin Development (Frontend + Backend)
This is where developers start building the actual app. Development includes:
Frontend: The screens users interact with
Backend: Databases, servers, APIs, and logic powering the app
Your team may use Agile methodology — a flexible, sprint-based model that breaks the mobile app development process into smaller, manageable chunks with regular testing and feedback.
Step 5: Test the App Thoroughly
Testing isn’t just for catching bugs — it’s about ensuring your app works across devices, screen sizes, and user scenarios.
Testing types include:
- Functional Testing
- Usability Testing
- Performance Testing
- Security Testing
In a 2024 report, apps that skipped structured testing saw 45% higher post-launch failure rates.
Step 6: Launch to App Stores
Once everything’s tested and approved, it’s time to go live.
For iOS, you’ll submit your app to the Apple App Store (with stricter review guidelines). For Android, you’ll publish it on the Google Play Store.
This phase also involves:
- Creating metadata (title, description, keywords)
- Uploading app screenshots
- Planning your launch marketing
Step 7: Post-Launch Support and Optimization
Your app launch isn’t the end — it’s the beginning.
Track how users interact with your app using analytics tools. Monitor bugs, performance issues, and feature requests. Most importantly, plan regular updates.
This is where long-term success lies. Continuous improvement is key to optimizing the mobile app development process and scaling your app sustainably.
Tips to Lead the App Development Process (Even If You’re not Technical)
You don’t need to be a developer to lead a successful mobile app development process — but you do need to be a strong product leader.
Here are practical ways to stay in control, make better decisions, and keep your app on track — even if you can’t write a single line of code.
1. Own the Vision, Not the Code
Your main job is to define what the app should do — not how it’s built. Stay focused on the end user and business goals, and let your team handle the technical execution.
Be clear about:
- Who your users are
- What success looks like
- Which features are essential for your MVP
This clarity reduces confusion and keeps your mobile app development step by step process aligned from start to finish.
2. Learn Just Enough Tech to Ask Smart Questions
You don’t need to become a software engineer — but knowing basic terminology (like APIs, sprints, backend, database, UI/UX) will help you understand trade-offs and timelines.
According to McKinsey, non-technical founders who understand core tech concepts are 35% more likely to deliver apps on time and within budget.
Start with the basics:
- What tech stack are we using?
- Are we following an agile mobile app development process?
- How are we handling security and data privacy?
- Asking smart questions = making smart decisions.
3. Communicate Weekly, Not Weakly
Set up weekly check-ins with your team or agency. Use project management tools (like Trello, Jira, or ClickUp) to track progress, timelines, and blockers.
Avoid vague updates like “We’re working on it.” Ask:
- What was completed this week?
- What’s next?
- Are there any risks to the timeline or budget?
4. Prioritize Features Ruthlessly
Trying to build everything at once is the fastest way to kill momentum and blow your budget. Instead, apply the 80/20 rule — focus on the 20% of features that deliver 80% of the value.
That’s how you optimize the mobile app development process without compromising quality.
5. Validate Early, Iterate Often
The best feedback doesn’t come from your dev team — it comes from users. Release early builds to a small audience. Watch how they interact. Listen. Adjust.
This feedback loop is essential to a lean and agile development process.
Final Thoughts: Start Your Mobile App Development Process with Confidence
You don’t need to be a developer to build a great app — but you do need a clear, strategic approach. By following a structured, mobile app development step by step process, non-technical founders can successfully turn ideas into fully functioning products.
From choosing the right development route to managing design, testing, and post-launch optimization, every phase counts. The key is knowing enough to lead — and partnering with people who can execute at a high level.